API Tip #1
2/15/2001 - Macro Basics
API Tip #2 5/16/2001 -
Modeling Parameters Using Excel VBA Tutorial
API Tip #3 10/22/2001 - Custom Properties
Tutorial
API TIP #1 2/15/2001 (top of page)
One of the best places to start working with the SolidWorks API (application programming interface) is to use its macro recording capability. When you record a macro in SolidWorks, you are able to record the Basic code required to accomplish many tasks. There are some limitations to what is recorded in a macro, but most of the basic functionality is automatic.
For this example we want to create a keyboard shortcut to perform a distance mate between two selected faces, edges or vertices in an assembly. As a result, we will be able to pre-select two objects and then type a keyboard shortcut that activates the macro. The only dialog we will see is one to prompt us for the distance value between the two selected objects.
Our goal in recording this macro is to capture only the act of applying the distance mate between two pre-selected objects.
Once we have created a basic macro it is typical to make modifications either to add functionality or to make it general enough to be used everywhere[1]. At this point we would like to modify the macro to prompt the user for a distance value for the mate.
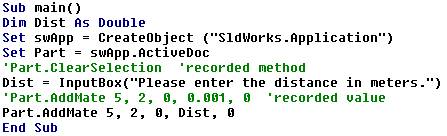
Now, what did we really do to the macro?
·
The variable “Dist” is declared as a double floating point
number so we can store user input distances in that variable.
·
We must disable the Part.ClearSelection method because we want the
two objects we had pre-selected to remain selected prior to adding the mate.
·
In order to prompt the user for a distance for the mate we use the
InputBox method. This VB method
displays a dialog box on the screen allowing the user to type in any value.
We’ve prompted them to “Please enter the distance in meters”
because most API calls require input in meters.
·
Next, we’ve disabled the recorded
mate since we want to apply a mate with a value other than 1mm.
Instead, we’ve added a new line of code, replacing the 0.001-meter
value with the “Dist” variable.
If you want to find out more about the AddMate method, search the index in the SolidWorks API Help Topics.
There are several ways to run the distancemate macro once it is recorded and modified. One of the best ways is to add a keyboard shortcut in SolidWorks to run the macro. That is why we saved the macro into the macros folder in the SolidWorks installation directory. To establish the keyboard shortcut:
Let’s test the macro. Open any assembly where you could apply a distance mate. Pre-select two items that would be valid for a distance mate and type your keyboard shortcut. You will be presented with a dialog to enter the distance value. Type it in and voila!
As you can see, making macros in SolidWorks can be a quick and easy way to automate repetitive tasks. You could use the same method to create shortcut keys to apply other mate types, add standard text to drawings, create quick converted entity extrusions, or anything else you can imagine!
[1] SolidWorks macros are simply ASCII text files containing Basic code. They are identical to a standard Visual Basic (VB) Module other than having a different file extension. If you wish to use the macro in a VB or VBA (Visual Basic for Applications) project, simply rename the file with the .bas extension rather than .vbp.
API Tip #2 5/16/2001 (top of page)
Tutorial Files for this tip
(click here)
One of the first things you use as a SolidWorks user are parameters. That’s why the software is called “parametric”. Design tables are a great way to use Microsoft Excel’s spreadsheet functionality to drive these parameters. This section will cover another method of controlling SolidWorks parameters through Excel’s VBA utilities. The great thing about VBA is that it works the same in any program that supports it! We will end up with an assembly containing an embedded Excel spreadsheet that controls part level dimensions.
The easiest things to control through the API are dimension values. Let’s record another macro in SolidWorks to see how this is done. For this example I will be using the assembly BEVELGEARBOX.sldasm from the gearboxfiles.zip file. Changing dimensions of single parts is just as simple, but this will illustrate the general idea.
Open the assembly BEVELGEARBOX.sldasm. Show all your feature dimensions by right-clicking on the Annotations folder in the FeatureManager Design Tree. You might also want to turn on the option to Show dimension names from the general category for easy access to specific dimensions. Now start recording a macro. Increase the value of ShaftDia1, BevDia1, ShaftDia2 and BevDia2 by 0.5 inches by double-clicking on each dimension. Rebuid the assembly and stop the macro. Name the macro dimensions.swp.
Let’s examine what was recorded. Edit the macro dimensions.swp. Your main procedure should be similar to the following code. I have modified the code below with … to fit the width of the page.
Sub main()
Set swApp =
CreateObject("SldWorks.Application")
Set Part = swApp.ActiveDoc
Part.SelectByID "ShaftDia1@Sketch1@bevelgear-1@BevelGearbox",…
Part.Parameter("ShaftDia1@Sketch1@bevelgear.Part").SystemValue =
0.0254
Part.SelectByID "ShaftDia2@Sketch1@bevelgear2-1@BevelGearbox",…
Part.Parameter("ShaftDia2@Sketch1@bevelgear2.Part").SystemValue =
0.0254
Part.SelectByID "BevDia1@Sketch1@bevelgear-1@BevelGearbox",…
Part.Parameter("BevDia1@Sketch1@bevelgear.Part").SystemValue = 0.1016
Part.SelectByID "BevDia2@Sketch1@bevelgear2-1@BevelGearbox", …
Part.Parameter("BevDia2@Sketch1@bevelgear2.Part").SystemValue = 0.0762
Part.EditRebuild
Part.ClearSelection
End Sub
SolidWorks will frequently record much more code than a macro would require. Each time you modify a dimension in SolidWorks, the macro records the action of selecting the dimension as well as changing its value. The selection of dimensions will not prevent the macro from working, but it will cause unnecessary processing to occur. Let’s optimize our macro by deleting or commenting out each line of code that uses the SelectByID method. If you deleted the extra code, your main procedure should look something like this.
Sub main()
Set swApp =
CreateObject("SldWorks.Application")
Set Part = swApp.ActiveDoc
Part.Parameter("ShaftDia1@Sketch1@bevelgear.Part").SystemValue =
0.0254
Part.Parameter("ShaftDia2@Sketch1@bevelgear2.Part").SystemValue =
0.0254
Part.Parameter("BevDia1@Sketch1@bevelgear.Part").SystemValue = 0.1016
Part.Parameter("BevDia2@Sketch1@bevelgear2.Part").SystemValue = 0.0762
Part.EditRebuild
Part.ClearSelection
End Sub
In the distance mate example, we learned that we can replace values in our code with a variable. We can also populate those variables with values by using the InputBox method. However, isn’t typing values into individual boxes the same as changing dimensions by double-clicking on them? All you are automating is the double-click. Maybe that is fun, but it’s not saving you any time. If you don’t save any time, how can you go home early on Friday? You also lose functionality if you use the InputBox method rather than the dimension modify dialog because you can’t type in arithmetic or units in an InputBox! So let’s use the power of Excel to help us. Excel was built to hold multiple values and to quickly define functional relations between them. There’s no need to reinvent the wheel.
Open the Excel spreadsheet
named BevelGearbox.xls. It
already has some cells filled out for the values we wish to control.
These cells will be used in place of the InputBox method for a “one
stop shop” for values. Let’s add a button to our spreadsheet that will activate a
macro inside Excel. If the Excel
Control Toolbox is not displayed, point to Toolbars on the View menu, and then
click Control Toolbox. Click the
button for the Command Button
![]() then click in the spreadsheet
window to insert one. You should
see something similar to Figure 1.
then click in the spreadsheet
window to insert one. You should
see something similar to Figure 1.
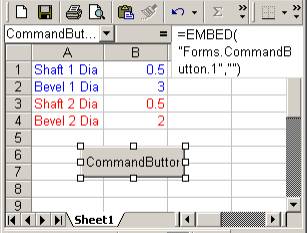
Figure 1
Now lets copy our macro we recorded in SolidWorks to the code behind this button. Toggle back to the SolidWorks VBA interface and copy all the code between, but not including, Sub main() and End Sub. Toggle back to Excel. To view the code behind the new command button, double-click on it or right-click on it and select View Code. You should see a VBA interface show up with a code module for this command button. Paste your copied code above the End Sub line. This procedure already has a name defined by the name of the button we created. When the button is clicked, the code in the procedure will be executed.
Private Sub CommandButton1_Click()
Set swApp = CreateObject("SldWorks.Application")
Set Part = swApp.ActiveDoc
Part.Parameter("ShaftDia1@Sketch1@bevelgear.Part").SystemValue =
0.0254
Part.Parameter("ShaftDia2@Sketch1@bevelgear2.Part").SystemValue =
0.0254
Part.Parameter("BevDia1@Sketch1@bevelgear.Part").SystemValue = 0.1016
Part.Parameter("BevDia2@Sketch1@bevelgear2.Part").SystemValue = 0.0762
Part.EditRebuild
Part.ClearSelection
End Sub
How do we access the values of our cells from the Excel spreadsheet? VBA in Excel is the same idea as VBA in SolidWorks. We’ll use an Excel API call to get the cell values from the current worksheet. Modify your code as show below to access the Excel values. The underscores are added to make the code more readable on the page.
Private Sub CommandButton1_Click()
Set swApp = CreateObject("SldWorks.Application")
Set Part = swApp.ActiveDoc
Part.Parameter("ShaftDia1@Sketch1@bevelgear.Part").SystemValue = _
Excel.Range("B1") * 0.0254
Part.Parameter("BevDia1@Sketch1@bevelgear.Part").SystemValue = _
Excel.Range("B2") * 0.0254
Part.Parameter("ShaftDia2@Sketch1@bevelgear2.Part").SystemValue = _
Excel.Range("B3") * 0.0254
Part.Parameter("BevDia2@Sketch1@bevelgear2.Part").SystemValue = _
Excel.Range("B4") * 0.0254
Part.EditRebuild
Part.ClearSelection
End Sub
We have accessed the Excel values by using the Range
method. This returns the value of
that cell range to input into our dimension parameters.
We’ve also added a multiplier of 0.0254 to convert the inch value shown
on the spreadsheet meters. Remember
that most SolidWorks API calls require an input value in meters. This is all the
code we need to try our example. From
the File menu in the VBA editor, select Close and Return to Microsoft Excel.
To quit design mode and enable the command button control, click Exit
Design Mode
![]() from the Control Toolbox.
The Excel spreadsheet will now control the SolidWorks assembly.
Try changing the values in the cells and then click the command button.
Because the macro extracts the cell values, you can use Excel formulas
and functions or additional worksheets to drive them.
The options are practically limitless!
from the Control Toolbox.
The Excel spreadsheet will now control the SolidWorks assembly.
Try changing the values in the cells and then click the command button.
Because the macro extracts the cell values, you can use Excel formulas
and functions or additional worksheets to drive them.
The options are practically limitless!
Rather than having an external file control our model, lets use OLE capability to copy and paste this Excel spreadsheet into our assembly. Simply select all the required cells (A1 to C7 if your spreadsheet looks like Figure 1) and copy them. Then toggle to your SolidWorks assembly and paste. Now your spreadsheet is embedded in your assembly. You no longer need that extra file. Go ahead, drop it in the recycle bin. To activate the embedded spreadsheet, double-click on it. Change the cell values and click your command button to watch the assembly update. Click outside the Excel object window to go back to the assembly and deactivate the spreadsheet.
API Tip #3 10/22/2001 updated 11-01-01
One of the most often overlooked areas of SolidWorks is the custom property. In this example we will look at creating custom properties from a program.
The first step will be creating custom properties and inserting them into a document. The methods used are valid for parts, assemblies or drawings. The two most common locations for custom properties are in parts and drawings.
SolidWorks does not record actions performed in some dialog boxes through macros. File properties are set only in a dialog box. Therefore, start and stop recording a macro without performing any actions. Save the file as properties.swp. Edit the macro we just created and remove the extra information so we’re left with the following:
Public
swApp As Object
Public Part As Object
Sub
main()
Set
swApp = CreateObject("SldWorks.Application")
Set Part = swApp.ActiveDoc
End Sub
Let’s start by populating some general properties. Add the following code to your macro.
Sub
main()
Set
swApp = CreateObject("SldWorks.Application")
Set Part = swApp.ActiveDoc
Dim
MyProp (1, 3) As String
'Property
names
MyProp(0, 0) = "LastSavedBy"
MyProp(0, 1) = "CreatedOn"
MyProp(0, 2) = "Revision"
MyProp(0, 3) = "Material"
'Property
values
MyProp(1,
0) = "$PRP:" & Chr(34) & "SW-Last Saved By" &
Chr(34)
MyProp(1, 1) = Date
MyProp(1, 2) = "A"
MyProp(1, 3) = "A36 STEEL"
Dim
m As Integer
For
m = 0 To 3
retval = Part.AddCustomInfo3("", MyProp(0,
m), 30, _
MyProp(1,
m))
Next m
End Sub
Again, we have made use of arrays for our property names and the corresponding values. We’ve also linked to some other automated functions and properties. SolidWorks has several properties you can link to. One of which is $PRP:“SW-Last Saved By”. This will always link to the login name of whoever saved the SolidWorks file last. The following list may be helpful in creating links to SolidWorks links.
All Documents$PRP:“SW-Author” |
Drawings Only$PRP:“SW-Current
Sheet” |
In
creating this link we have used a VB character function with the code Chr(34).
The reason for this is that quotes mean something specific in VB.
They start and finish a string definition.
However, we need to have quotes in our string.
Chr(34)
passes a quote character to the string without terminating the string
definition. Other helpful
characters are listed below.
Chr(8)
backspace
Chr(9)
tab
Chr(13)
carriage return
Chr(34)
”
Chr(38)
&
Chr(176)
°
Chr(177)
±
Chr(216)
Ø
For MyProp(1, 1), we have used the VB Date function. This function returns the current date in mm/dd/yyyy format.
Last, we added a For…Next statement or loop that fills in all of the properties using the Part.AddCustomInfo3 SolidWorks method.
retval = ModelDoc.AddCustomInfo3 ( configuration, FieldName, FieldType, FieldValue )
The AddCustomInfo3 method has the following structure:
swCustomInfoText = 30
swCustomInfoDate = 64
swCustomInfoNumber = 3
swCustomInfoYesOrNo = 11
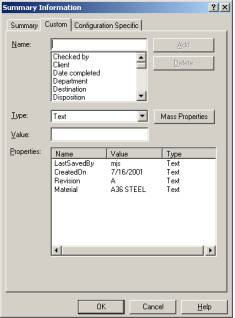
Go ahead and run your macro at this point. It now fills out the properties we specified and their corresponding values. If you look at your file properties at this point they should look like the image shown.
Look for another installation soon that will describe how to add a graphical user interface or GUI to this simple macro.
Mike Spens
