API Tip #3 10/22/2001 updated 11-01-01
One of the most often overlooked areas of SolidWorks is the custom property. In this example we will look at creating custom properties from a program.
The first step will be creating custom properties and inserting them into a document. The methods used are valid for parts, assemblies or drawings. The two most common locations for custom properties are in parts and drawings.
SolidWorks does not record actions performed in some dialog boxes through macros. File properties are set only in a dialog box. Therefore, start and stop recording a macro without performing any actions. Save the file as properties.swp. Edit the macro we just created and remove the extra information so we’re left with the following:
Public
swApp As Object
Public Part As Object
Sub
main()
Set
swApp = CreateObject("SldWorks.Application")
Set Part = swApp.ActiveDoc
End Sub
Let’s start by populating some general properties. Add the following code to your macro.
Sub
main()
Set
swApp = CreateObject("SldWorks.Application")
Set Part = swApp.ActiveDoc
Dim
MyProp (1, 3) As String
'Property
names
MyProp(0, 0) = "LastSavedBy"
MyProp(0, 1) = "CreatedOn"
MyProp(0, 2) = "Revision"
MyProp(0, 3) = "Material"
'Property
values
MyProp(1,
0) = "$PRP:" & Chr(34) & "SW-Last Saved By" &
Chr(34)
MyProp(1, 1) = Date
MyProp(1, 2) = "A"
MyProp(1, 3) = "A36 STEEL"
Dim
m As Integer
For
m = 0 To 3
retval = Part.AddCustomInfo3("", MyProp(0,
m), 30, _
MyProp(1,
m))
Next m
End Sub
Again, we have made use of arrays for our property names and the corresponding values. We’ve also linked to some other automated functions and properties. SolidWorks has several properties you can link to. One of which is $PRP:“SW-Last Saved By”. This will always link to the login name of whoever saved the SolidWorks file last. The following list may be helpful in creating links to SolidWorks links.
All Documents$PRP:“SW-Author” |
Drawings Only$PRP:“SW-Current
Sheet” |
In
creating this link we have used a VB character function with the code Chr(34).
The reason for this is that quotes mean something specific in VB.
They start and finish a string definition.
However, we need to have quotes in our string.
Chr(34)
passes a quote character to the string without terminating the string
definition. Other helpful
characters are listed below.
Chr(8)
backspace
Chr(9)
tab
Chr(13)
carriage return
Chr(34)
”
Chr(38)
&
Chr(176)
°
Chr(177)
±
Chr(216)
Ø
For MyProp(1, 1), we have used the VB Date function. This function returns the current date in mm/dd/yyyy format.
Last, we added a For…Next statement or loop that fills in all of the properties using the Part.AddCustomInfo3 SolidWorks method.
retval = ModelDoc.AddCustomInfo3 ( configuration, FieldName, FieldType, FieldValue )
The AddCustomInfo3 method has the following structure:
swCustomInfoText = 30
swCustomInfoDate = 64
swCustomInfoNumber = 3
swCustomInfoYesOrNo = 11
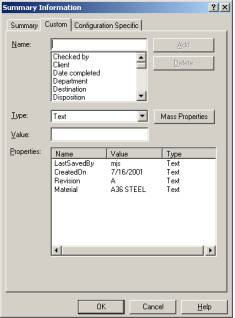
Go ahead and run your macro at this point. It now fills out the properties we specified and their corresponding values. If you look at your file properties at this point they should look like the image shown.
Look for another installation soon that will describe how to add a graphical user interface or GUI to this simple macro.
Mike Spens