Tip #9: 11/07/2000
Custom Properties

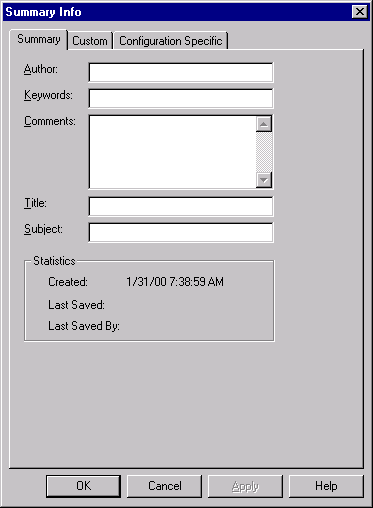
You will see a dialog box called "Summary Info"

For part files and assembly files, the Summary Info dialog has three sections to it accessed by the three tabs at the top: Summary, Custom, Configuration Specific. Drawings cannot be saved with different configurations, so only Summary and Custom properties can be assigned to drawing files.
There are a couple ways to get your properties into your file. Lets look at what I call "The Manual Way". After "The Manual Way," I will go over a technique to place more than one property at a time, and follow the same properties every time with the option to add more at anytime.
Summary Info Tab
Summary Properties are simply text boxes that you can store useful information. Author, Keywords, Comments, Title, and Subject can take any text you feel like typing in. Nothing has to be in this tab ever. It is just for your info, nothing else.
Custom and Configuration Specific
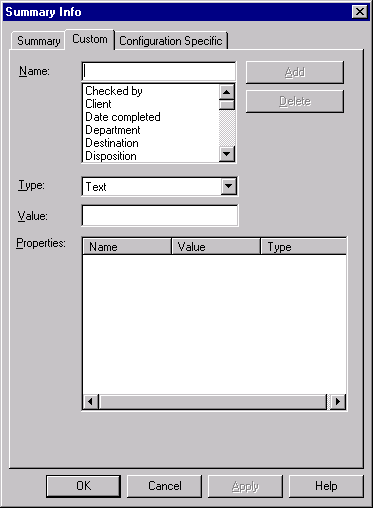
Custom Properties exist in all three file types: parts, assemblies, and drawings. They are a huge power in SolidWorks. Custom Properties can contain more than just text. When creating a custom property you have to specify a Name and Value.
At the bottom of this dialog, is a list showing the current list of properties, their value, and their type. It also allows you to select an existing property, so you can Modify or Delete it. If you are modifying the value of a property, don’t forget to press the Modify Button before pressing the OK Button. I’ve made this mistake numerous times.
The Configuration Specific Properties operate in exactly the same way as Custom Properties. As you change the current configuration of you part or assembly, only the properties created for the current configuration will be shown. In contrast, Custom Properties will always be available regardless of the current configuration. For more information on creating and using configuration, refer to the SolidWorks Help.

To add custom properties:
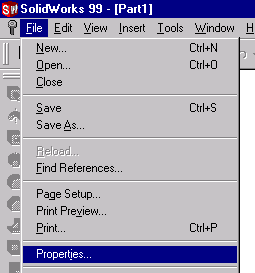
1. Click File, Properties.
2. To add properties to the file, click the Custom tab. (To add properties to the active configuration, click the Configuration Specific tab.)
3. Enter a Name for the property, or
choose a name from the list. (NOTE: If you plan to use the custom properties as columns in the bill of materials, do not
use property names that contain spaces.)
4. Select the Type of value (text, number, and so on) for the custom property.
5. Enter a Value for the custom property that is compatible with the selection in the Type box.
6. Click Add. The Properties box displays the name, value, and type of the custom properties.
Modify custom properties:
1. In the Properties box, click the Name of the property that you want to change.
2. Edit the Type or Value as needed.
3. Click Modify.
Delete a custom property:
In the Properties box, click the Name of the property that you want to delete, then click Delete.
Copyright© 2000 by SolidWorks Corporation. All rights reserved.
The non-manual way (The Easy Way)
This next technique I call "The Easy Way" involves an Excel template
and using the design tables. ![]() (available for
download)
(available for
download) ![]()
Optional: Go to Tools à Options. In the General tab, make sure there is a checkmark (ü) on the option "Edit Design Tables in separate window". It is not necessary, but this will make it easier.
To use the design table from within a part, choose Insert à Design Table (not New Design Table). A dialog will appear to ask you what *.xls file you would like to use. Browse to the directory where the Excel file is, (download above) and choose it. It will bring up Excel within SolidWorks, and you may fill-in info. in the Excel template. All the info. does not have to be filled in because it can be brought back up at any time to be changed or added to. When you are finished adding all the properties that you feel you need at this time, all you need to do is File à Exit the Excel program then the properties are entered into the Custom Properties as discussed above. Except in this case, all properties are found under Configuration Specific - which is ok.
If anything needs to be added or changed, just simply choose Edit à Design Table, add or change what is needed, and exit Excel again.
Using Properties
So now you can create all these properties, but you don’t know what to do with them. Well they can be used in annotations (notes), in the BOM of a drawing, or in a drawing template. Lets take a look at these.
The first thing we will look at is the template in the use of these properties. Do you hate having to go into your template (title block) every time you make a drawing and fill out your name, description, drawn by date, sheet number, and anything else on the template? The properties can be used to automatically fill out all that information.
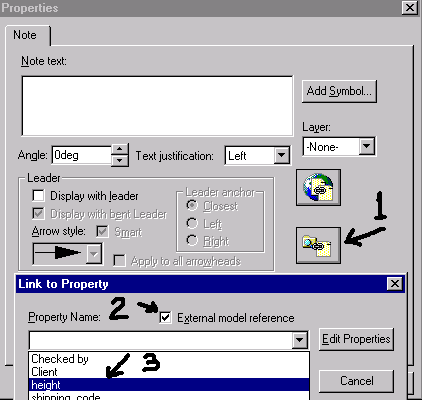
To link a property to a note:
1. In the Note dialog box, click the Link to Property icon . (number 1
below on the picture)
2. Click the arrow on the Property Name drop-down list. . The list of available properties depends on where the note was created. In all cases, only those properties with values assigned are listed.
All documents have the system-defined property SW-File Name. Drawings have additional system-defined properties that you can use to customize a template.
3. To add a new property, or to edit an existing one, click Edit Properties, then edit the properties on the Summary Info – Custom tab (for the document) or the Summary Info – Configuration specific tab (for the active part or assembly configuration).
4. Select a property from the list, and click OK.
The Note Text shown in the dialog box is $PRP:"propertyname". In the document, the note text is the value assigned to the property.
Copyright© 2000 by SolidWorks Corporation. All rights reserved.

That's easy enough. If you do this and save your template, then every time you create a drawing with any of the properties, they auto-fill the template, and change when the part file changes. This also allows you to have the same font, and in the same place every time. EXAMPLE FILES DOWNLOAD
BOM's and Properties:
Do you want to make your BOM in 30 seconds instead of in 30 minutes? Use the properties to create your BOM. Adding custom columns into the BOM, and having SolidWorks insert the BOM will get the job done in seconds.